- Published on
React, TypeScript & Mobx

Overview
I build the web application that allows us to work with Mobx, TypeScript, React, and 3rd API Services. This article focuses on practical examples as the best way to understand the concepts of technologies and part of patterns theory.
I'll use two ways of organizing React Components for showing different ways of using stores, Class-based Components, and Functional Components with React Hooks.
Setup Application
I'll provide a short introduction to the setup process, you can skip this section if you already know it. If you need a more specific application, please use custom webpack/rollup/parcel or something else, but we'll use Create React App with TypeScript support for simple process of setup:
- Install create-react-app with TypeScript
npx create-react-app typescript-mobx-react --template typescript
- Install types needed for TypeScript as development dependencies
npm i --save-dev typescript @types/node @types/react @types/react-dom @types/jest
- Install Mobx and its connection to React
npm i mobx mobx-react
App's source code is nested beneath the src directory. And structure of application will be:
├── src
│   ├── components
│   ├── containers
│   ├── contexts
│   ├── hocs
│   ├── hooks
│   ├── pages
│   ├── services
│   ├── stores
│   └── index.tsx
├── dist
├── node_modules
├── README.md
├── package.json
└── .gitignore
Setup Services & Stores
I started developing my application by designing stores in the domain area. A few main concepts of stores composition that I need for my application:
- Easy communication between stores.
- Root store composition with children stores.
- Separate communications and stores.
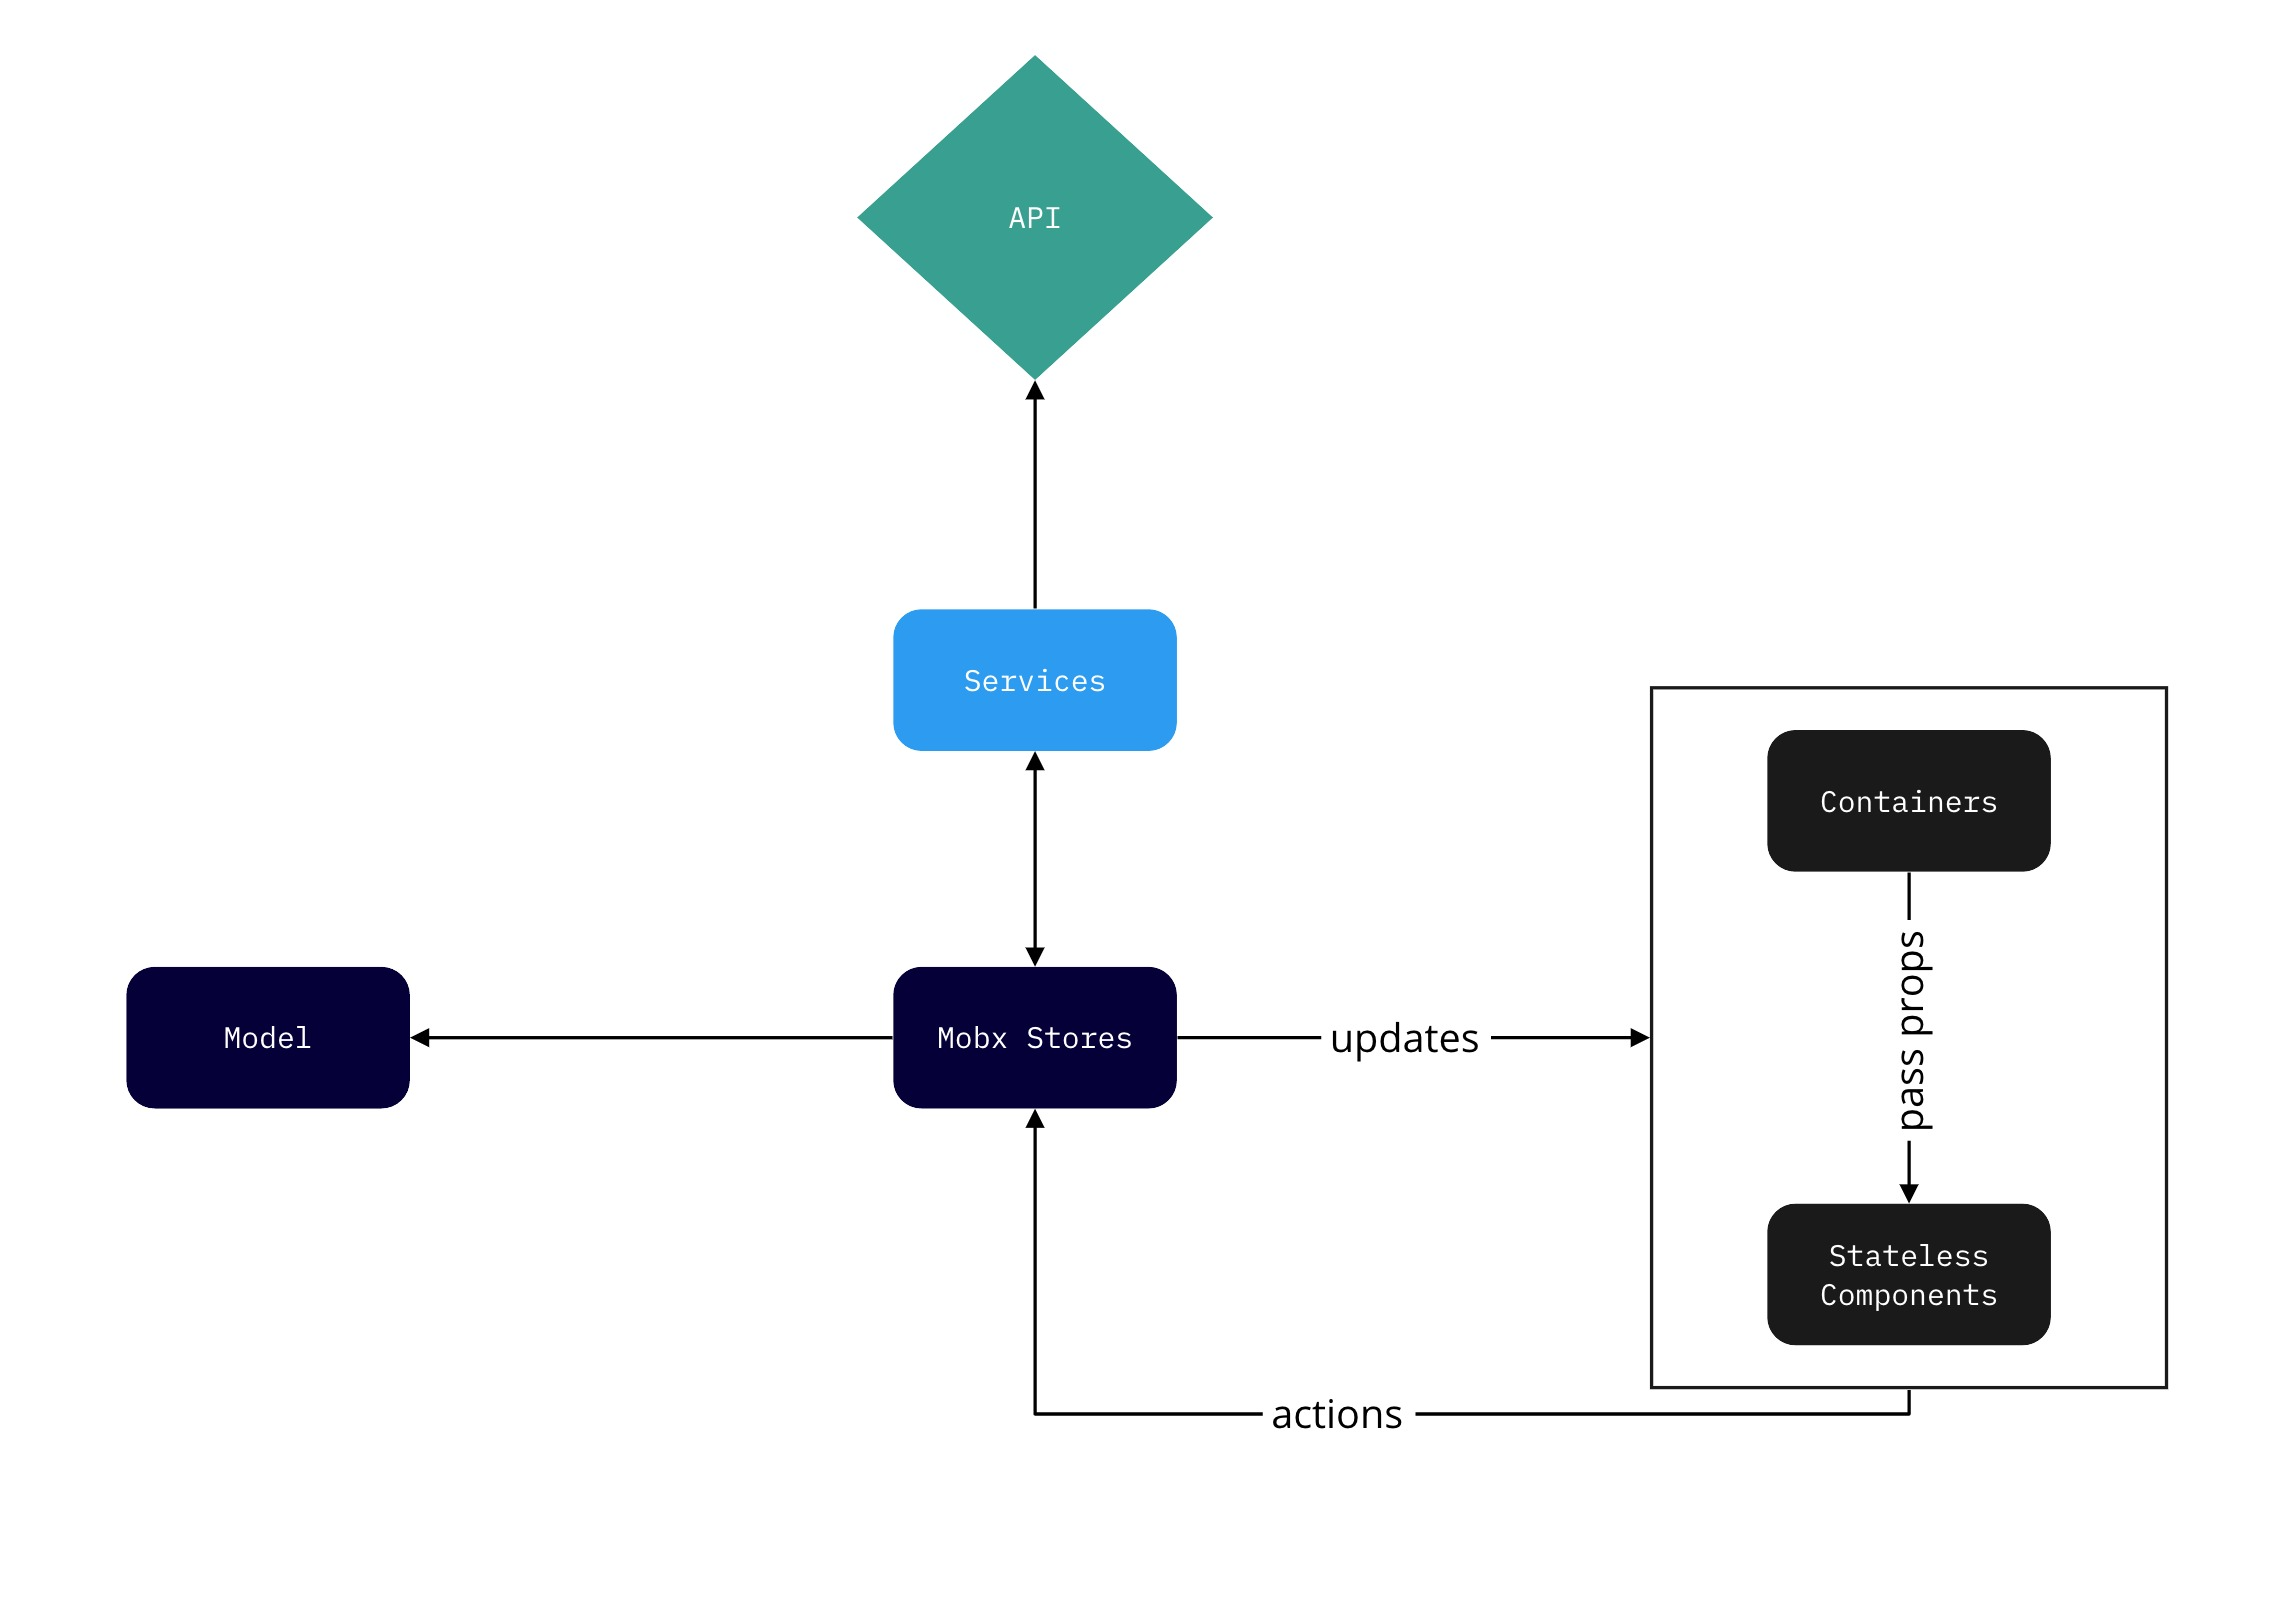
So I designed my application approach with MVC like Design Pattern and layered architecture as follows:
- All backend communications (in our case we use only Spotify API as 3rd Service) are done by Service Layer.
- The store has a state of the application so it consumes service Defining data stores. All service functions will be called in the only store, components execute Store actions when the state is needed.
- Presentational Component can use the store directly by injecting the store or Props from Container Component can be passed in it.
- Container or Presentational Component can invoke store actions and automatic rendering of components will be done by Mobx.
Services are a place for communication between application and Backend Services. We use this separation for a more flexible and elegant way to organize our codebase, cause if we'll use service calls inside the store then we'll find complicated stores with harder test writing process when an application will scale. Inside a store, we call the service method and update the store only inside the @action decorator of Mobx. Service methods are needed only for communication and they don’t modify Stores, we can modify observable variables only inside @action calls in Stores.

The main responsibilities of Stores:
- Separate logic and state with components.
- A standalone testable place that can be used in both Frontend and Backend JavaScript. And you can write really simple unit tests for your Stores & Services with any codebase size.
- A single source of truth of Application.
An alternative, more opinionated way of organizing stores is using mobx-state-tree, which ships with cool features as structurally shared snapshots, action middlewares, JSON patch support, etc out of the box.
But Mobx-State-Tree (MST) is a like framework based on Mobx and when you start using MST you need to implement practices and API from MST. But I want to use more native way of my codebase and less overkill for my needs. If you want to see the big codebase of MST and Mobx, you can check my previous big opensource project of data labeling and annotation tools for ML on React, Mobx, and MST - Label Studio and Frontend Part of Label Studio. In MST we have many awesome things like a Tree, Snapshots, Time Travelling, etc.
Organizing Stores
The primary purpose of Mobx is to simplify the management of Stores. As application scales, the amount of state you manage will also increase. This requires some techniques to break down your application state and to divvy it up across a set of stores. Of course, putting everything in one Store is not prudent, so we apply divide-and-conquer instead.
And don't write your business logic in your components, because when you writing it, you have no way to reuse it. Better way is writing the business logic with methods in the Stores and call these methods from your containers and components.
Communication between stores
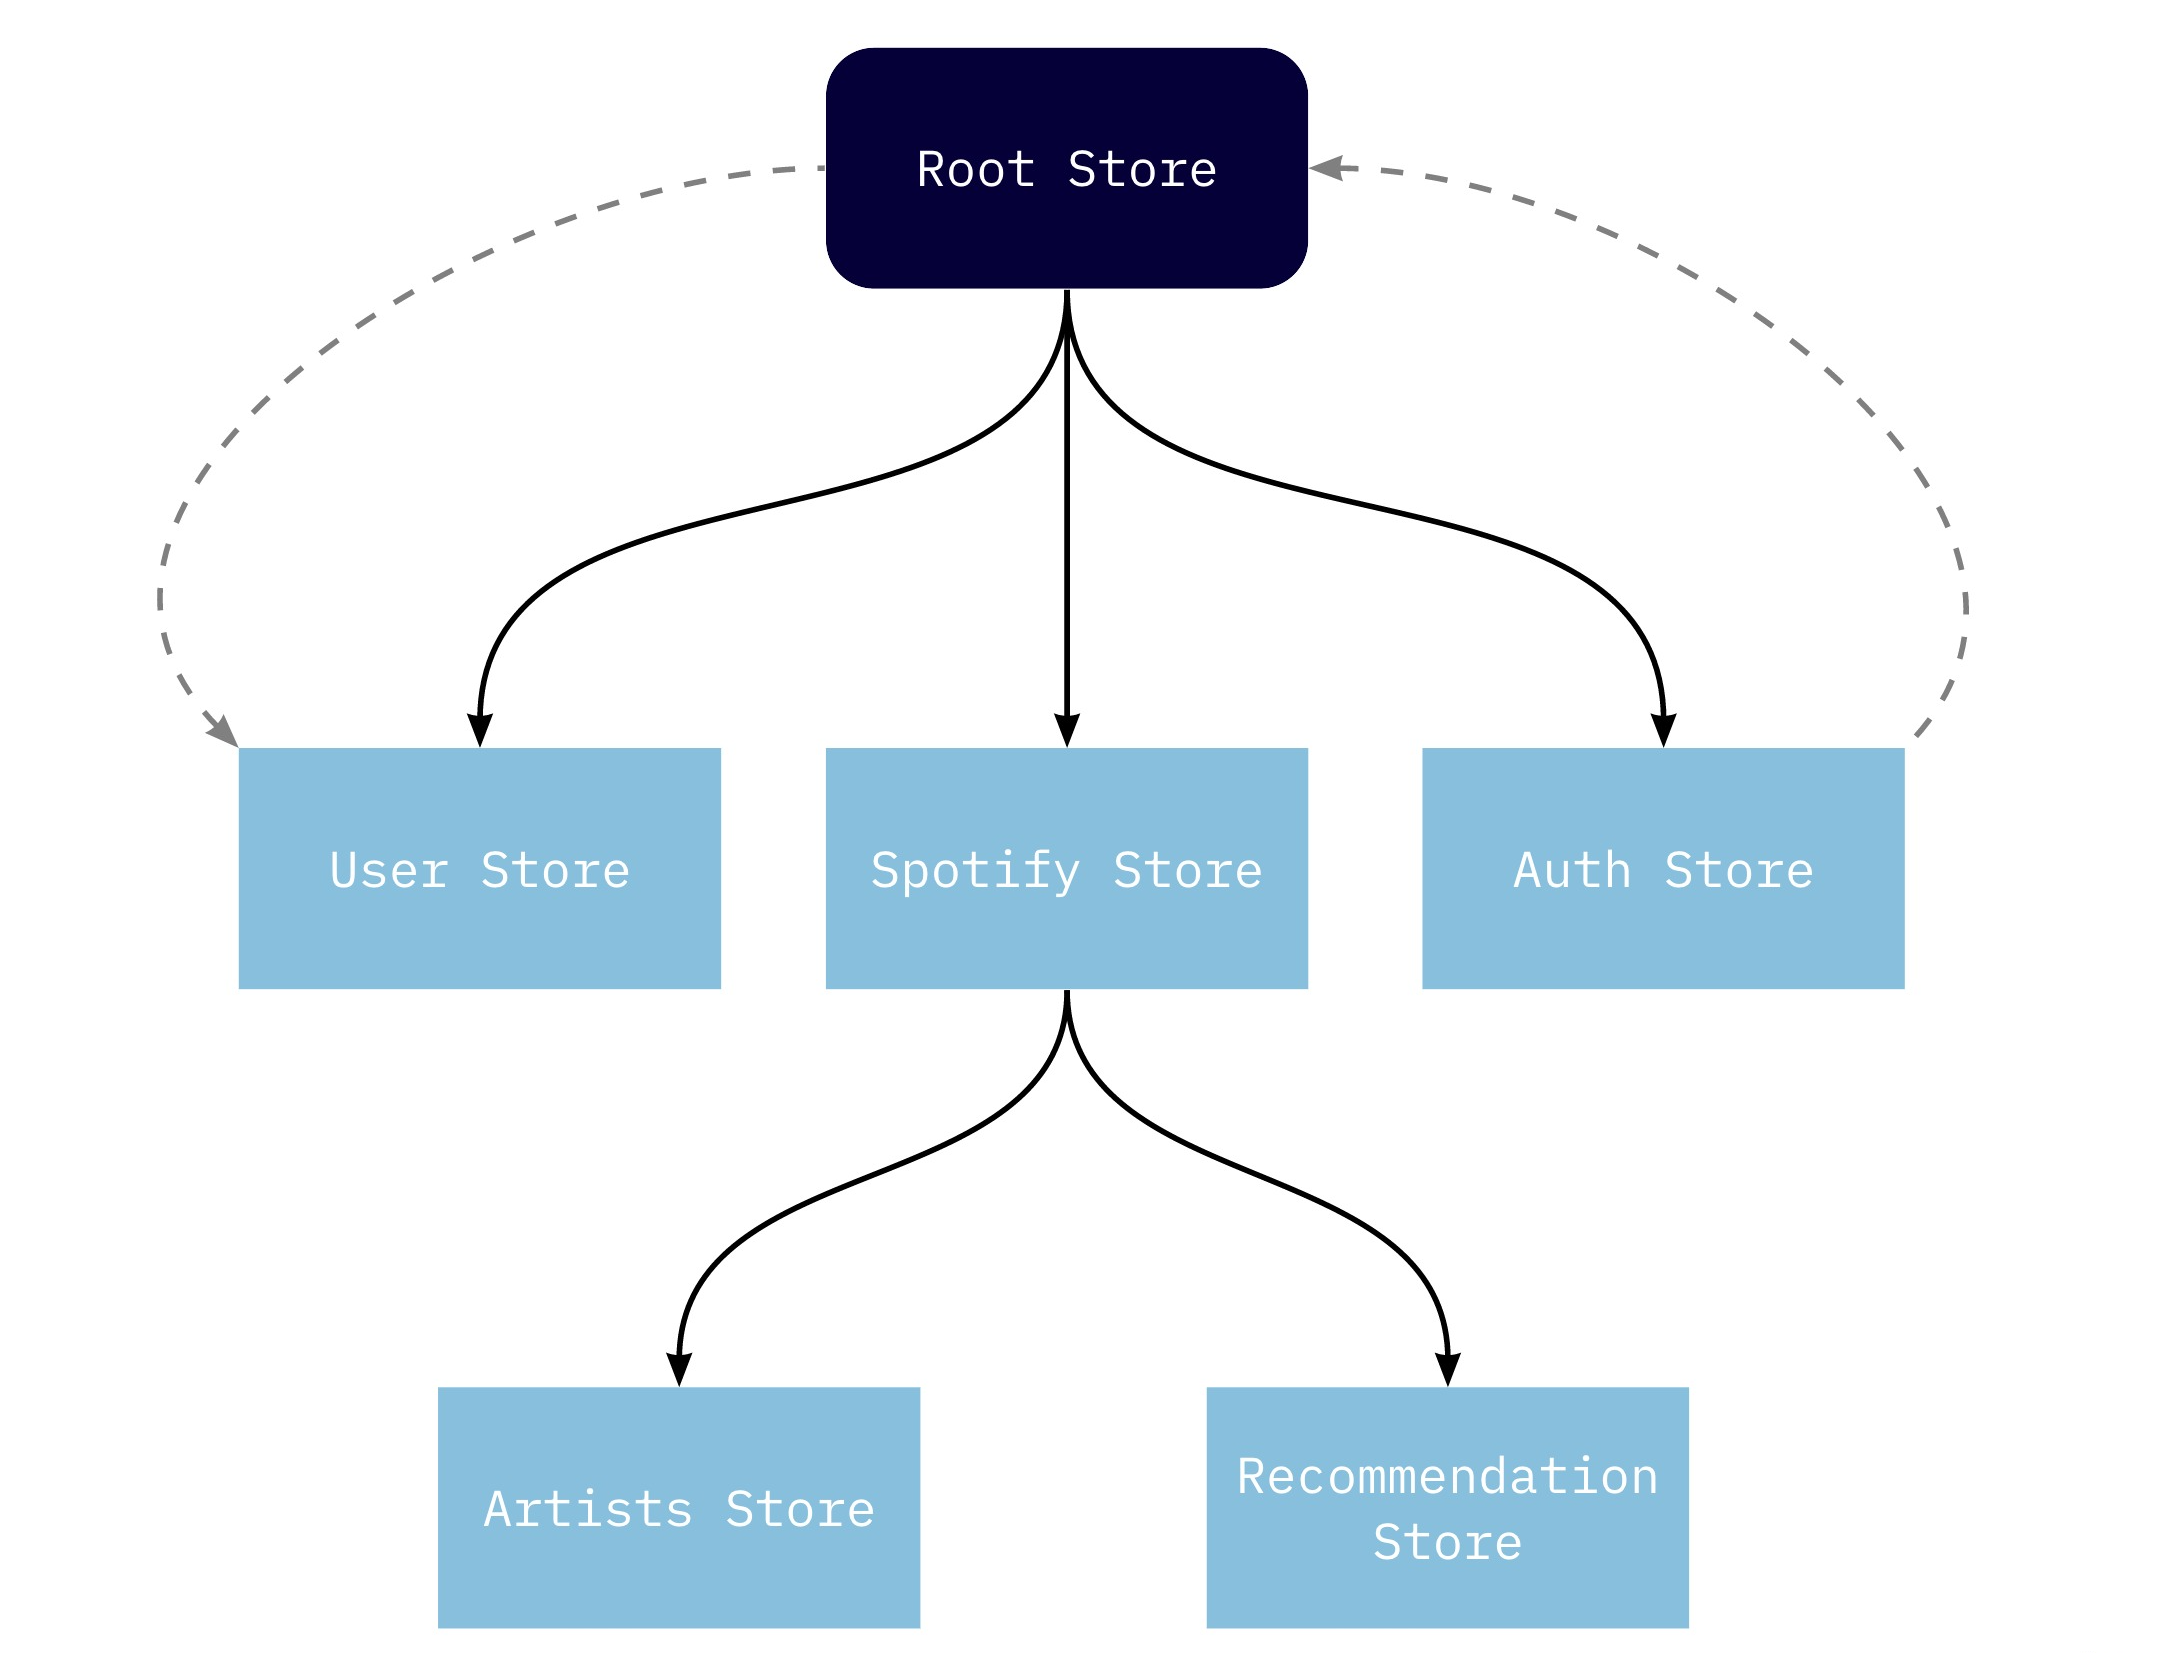
The main concept of stores communication is using Root Store as a global store where we create all different stores and pass global this inside a constructor of Root Store. Stores are the place of the truth for application.

Root Store collects all other stores in one place. If your children store needs methods or data from another store, you can pass this into a store like as User Store for easy communication between stores. The main advantages of this pattern are:
- Simple to set up your application.
- Supports strong typings well.
- Makes complex unit tests easy as you just have to instantiate a root store.
/**
 * Import all your stores
 */
import { AuthStore } from './AuthStore';
import { UserStore } from './UserStore';

/**
 * Root Store Class with
 */
export class RootStore {
	authStore: AuthStore;
	userStore: UserStore;

	constructor() {
		this.authStore = new AuthStore();
		this.userStore = new UserStore(this); // Pass `this` into stores for easy communication
	}
}
And then you can use methods from Auth Store in User Store for example:
import { observable, action } from 'mobx';
import { v4 as uuidv4 } from 'uuid';
import { RootStoreModel } from './rootStore';

export interface IUserStore {
	id: string;
	name?: string;
	pic?: string;
}

export class UserStore implements IUserStore {
	private rootStore: RootStoreModel;

	@observable id = uuidv4();
	@observable name = '';
	@observable pic = '';

	constructor(rootStore?: RootStoreModel) {
		this.rootStore = rootStore;
	}

	@action getName = (name: string): void => {
		if (rootStore.authStore.id) {
			this.name = name;
		}
	};
}
Context Provider to pass Store
Context provides a way to pass data through the component tree without having to pass props down manually at every level. Nothing spectacular about it, better to read React Context if you are unsure though. Let's create Provider for our Application:
import React, { FC, createContext, ReactNode, ReactElement } from 'react';
import { RootStoreModel } from '../stores';

export const StoreContext = createContext<RootStoreModel>({} as RootStoreModel);

export type StoreComponent = FC<{
	store: RootStoreModel;
	children: ReactNode;
}>;

export const StoreProvider: StoreComponent = ({ children, store }): ReactElement => {
	return <StoreContext.Provider value={store}>{children}</StoreContext.Provider>;
};
And you can use in the entry point of Application:
import React from 'react';
import ReactDOM from 'react-dom';

import { StoreProvider } from './store/useStore';

import App from './App';

ReactDOM.render(
	<React.StrictMode>
		<StoreProvider>
			<App />
		</StoreProvider>
	</React.StrictMode>,
	document.getElementById('root')
);
Class and Functional Components
We can use both ways of our components — Class-based components and Functional components with React Hooks as a modern way to organize React Application.
If you are using use only Functional Components with React Hooks, you can use mobx-react-lite instead of mobx-react to reduce size bundle. If you are using Class-based components and Functional components, please use only mobx-react@6 which includes mobx-react-lite and uses it automatically for function components.
Custom HOC to provide Store into a Class-based Components
React Context replaces the Legacy Context which was fairly awkward to use. In simple words, React Context is used to store some data in one place and use it all over the app. Previously, Mobx had Provider/inject pattern, but currently this pattern is deprecated and we must use only one way - Context. And again, it's not mandatory to use React Context with Mobx but it's recommended now officially on the mobx-react website. You can read more info about it here - Why is Store Injecting obsolete?
And I wrote HOC (High Order Component) for support Class based Components:
import React, { ComponentType } from 'react';
/**
 * https://reactjs.org/docs/higher-order-components.html#static-methods-must-be-copied-over
 */
import hoistNonReactStatics from 'hoist-non-react-statics';

import { useStores } from '../hooks/useStores';

export type TWithStoreHOC = <P extends unknown>(
	Component: ComponentType<P>
) => (props: P) => JSX.Element;

export const withStore: TWithStoreHOC = (WrappedComponent) => (props) => {
	const ComponentWithStore = () => {
		const store = useStores();

		return <WrappedComponent {...props} store={store} />;
	};

	ComponentWithStore.defaultProps = { ...WrappedComponent.defaultProps };
	ComponentWithStore.displayName = `WithStores(${
		WrappedComponent.name || WrappedComponent.displayName
	})`;

	hoistNonReactStatics(ComponentWithStore, WrappedComponent);

	return <ComponentWithStore />;
};
And Class based Component will be:
import React, { Component } from 'react';
import { observer } from 'mobx-react';

import { withStore } from '../hocs';

class UserNameComponent extends Component {
    render() {
        const { store } = this.props;
        return (
            <div>{store.userStore.name}<div>
        )
    }
}

export default withStore(observer(UserNameComponent));
This one is an elegant way to use Stores inside Components. If you want to use decorators, the code will be:
import React, { Component } from 'react';
import { observer } from 'mobx-react';

import { withStore } from '../hocs';

@withStore
@observer
class UserNameComponent extends Component {
    render() {
        const { store } = this.props;
        return (
            <div>{store.userStore.name}<div>
        )
    }
}

export default UserNameComponent;
React Hook with Stores for Functional Components
We add a function to help us to get the stores inside the React Functional Components. Using useContext that React provides us, we pass the previously created context to it and get the value we spicified.
import { useContext } from 'react';
import { RootStore } from '../stores';
import { StoreContext } from '../contexts';

export const useStores = (): RootStore => useContext(StoreContext);
Functional Components
If you want to use functional components, you need to use only observer function from mobx-react bindings and useStores hook of our Application:
import React from 'react';
import { observer } from 'mobx-react';

import { useStores } from '../hooks';

const FunctionalContainer: FC = observer((props) => {
	const { userStore } = useStores();

	return <div>Functional Component for ${userStore.name}</div>;
});

export default FunctionalContainer;
Services Layer
Services layer is the place of communications with Backend, 3rd API. Don't call your REST API Interfaces from within your stores. It really makes them hard to test your code. Instead of, please put these API Calls into extra classes (Services) and pass these instances to each store using the store's constructor. When you write tests, you can easily mock these API calls and pass your mock API Instance to each store.
For example, we need a class SpotifyService where we can use API and this class is Singleton. I use Singleton pattern because I want just a single instance available to all Stores.
import SpotifyWebApi from 'spotify-web-api-js';

export interface APISpotifyService {
	getAlbums(): Promise<void>;
}

class SpotifyService implements APISpotifyService {
	client: SpotifyWebApi.SpotifyWebApiJs;

	constructor() {
		this.client = new SpotifyWebApi();
	}

	async getAlbums(): Promise<void> {
		const albums = await this.client.getMySavedAlbums();

		return albums;
	}
}

/**
 * Export only one Instance of SpotifyService Class
 */
export const SpotifyServiceInstance = new SpotifyService();
And you can use in your Stores in this way:
import { action } from 'mobx';
import { SpotifyServiceInstance } from '../services';

export class UserStore implements IUserStore {
	@action getAlbums = (): void => {
		SpotifyServiceInstance.getAlbums();
	};
}
Conclusion
To sum up, this guide shows how we can connect React with Hooks and Classes with Mobx and TypeScript. I think this combination of MVC pattern with Mobx, React and TypeScript produces highly typed, straightforward and scalable code.
The source code will be available on my github & will be under the MIT License for your using when I'll publish the second part of the article series.
I hope this walkthrough was interesting and you can could find some information that helped in your projects. If you have any feedback or something else, please write to me on twitter and we will discuss any moments.